Jan 17 2021, Sunday
Computational Cameras and DepthAI
Modern phones have amazing computational cameras. As a developer, you have access to the RAW image stream and you can post-process frames harnessing the full power of the GPU; or better yet, more dedicated hardware.
My first stand-alone computational camera was a Samsung Galaxy Camera. This ran the Android which meant, you had access to all the Camera APIs. This was great because one could use familiar tools and deploy apps that could run on the camera itself.
Another project that comes to mind is JeVois. This camera was more interesting, because you had access to the full suite of OpenCV APIs which could run on the camera itself (accelerated by the onboard GPU).
Recently I have been experimenting with DepthAI hardware. The megaAI can run ML workloads on the on-board MyriadX VPU. Luxonis (the parent company) also ran an incredibly successful KickStarter campaign for their latest camera, OAK. I highly recommend backing the project - because this is one incredible camera.
Running traditional CV Algorithms
The DepthAI cameras ( megaAI, OAK, OAK-D et.al.) can run accelerated ML workloads on the dedicated VPU. The Depth AI SDK makes it easy to download new models, thanks to a Model Zoo.
However, i also wanted to be able to accelerate traditional Computer Vision algorithms. Simple things like contrast stretching, thresholding, segmentation etc.
OpenCL ?
The MyriadX VPU is an Intel project. The SDK is an fully open source project.
My first instinct was to be able to use OpenCL, because that is exactly what Intel used for their implementation.
OpenCL as an SDK has not aged well. Also, I am not an expert when it comes to OpenCL. The most experience I have had with an OpenCL like SDK was RenderScript on Android.
The OpenVINO documentation) also did not make it any easier. First, it was unclear if OpenCL was actually officially supported. It looks like they might have supported it on their NCS Compute Stick but there was very little documentation about MyriadX support.
I finally found some documentation which made it seem like this could work. I eventually managed to compile a super simple OpenCL kernel but the development experience was unsatisfactory. I found it very hard to be able to debug the kernel despite it being < 30 lines of code.
ML Frameworks for Vectorized Math
I took a step back, and then I realized that I might have been approaching this problem the wrong way.
I realized that I could just build a custom PyTorch model that could run on the MyriadX VPU (using Intel's Model Optimizer). Only, the model was not going to a real ML model, but an entry point for me to run vectorized math on the VPU.
To test my idea, I wrote a very basic "model" that converted RGB images to Gray Scale images. Here is what the source looked like:
class Grayscale(nn.Module):
    """
    Converts a batch of RGB -> Gray Scale
    1, H, W, C
    """

    def __init__(self, shape: Tuple[int, int, int, int], dtype=torch.float):
        super(Grayscale, self).__init__()
        self.shape = shape
        self.dtype = dtype

    def forward(self, x):
        # A simplified version of GrayScale.
        # 1, H, W, C as BGR
        y_b = x[0, :, :, 0]
        y_g = x[0, :, :, 1]
        y_r = x[0, :, :, 2]
        g_ = 0.3 * y_r + 0.59 * y_g + 0.11 * y_b
        # Add the channel
        g_ = torch.unsqueeze(g_, dim=2)
        # Add the batch
        g_ = torch.unsqueeze(g_, dim=0)
        return g_
The above nn.Module expects a batch of tensors. The batch_size being used is 1 (because we are only doing inference). The image channel ordering is BGR.
Exporting the model to ONNX
The OpenVINO SDK ( v2020.1) does not officially support PyTorch so we need to export the model to an intermediate format that is supported. Fortunately this is super easy to do.
def export():
    output_dir = Path(__file__).parent / 'out'
    output_dir.mkdir(parents=True, exist_ok=True)
    export_onnx(output_dir=output_dir)
    print('Done.')


def export_onnx(output_dir):
    """
    Exports the model to an ONNX file.
    """
    # Define the expected input shape (dummy input)
    shape = (1, 300, 300, 3)
    # Create the Model
    model = GrayscaleModel(shape=shape, dtype=torch.float)
    X = torch.ones(shape, dtype=torch.float)
    torch.onnx.export(
        model,
        X,
        f'{output_dir.as_posix()}/model.onnx',
        opset_version=9,
        do_constant_folding=True
    )
Producing IR using the OpenVINO Model Optimizer
The Model Optimizer in OpenVINO's SDK converts an ONNX model to an intermediate representation ( IR). This is a way for Intel to abstract away ML frameworks being used. They support ( TensorFlow, ONNX, Caffe etc.)
When producing the IR we also need to provide a couple of additional hints to the optimizer. We are using a data type half which represents FP16, and a batch size of 1.
# Use FP16 and make the batch_size explicit.
python mo_onnx.py --input_model "/path/to/model.onnx" --data_type half --batch 1
This produces a list of files.
-
model.xmlis an XML representation of the model graph (theIR). -
model.mappingis a list of mappings. It's unclear what this is used for.
Converting IR to a BLOB
Once you have Model IR, the final step is to convert it into a proprietary blob.
./myriad_compile -m path/to/model.xml -o /output/path/to/model.blob -ip U8 -VPU_MYRIAD_PLATFORM VPU_MYRIAD_2480 -VPU_NUMBER_OF_SHAVES 4 -VPU_NUMBER_OF_CMX_SLICES 4You should now be able to run model.blob on the MyriadX VPU.
Running the Model
The DepthAI SDK makes it super easy to run the model. All you need to do is to create a pipeline where the outputs of the camera are linked as an input to the model.
Finally the outputs of the model are connected to the host device that the camera is connected to.
from pathlib import Path

import cv2
import numpy as np

import depthai as dai

if __name__ == "__main__":
    model_path = Path(__file__).parent / 'custom_ops/out'
    pipeline = dai.Pipeline()
    # Source
    camera = pipeline.createColorCamera()
    camera.setPreviewSize(300, 300)
    camera.setCamId(0)
    camera.setResolution(dai.ColorCameraProperties.SensorResolution.THE_1080_P)
    camera.setInterleaved(True)
    # Ops
    detection = pipeline.createNeuralNetwork()
    blob_path = model_path / 'model.blob'
    detection.setBlobPath(f'{blob_path.as_posix()}')
    # Link Camera -> Model
    camera.preview.link(detection.input)
    # Link Model Output -> Host
    x_out = pipeline.createXLinkOut()
    x_out.setStreamName('custom')
    detection.out.link(x_out.input)

    device = dai.Device(pipeline)
    device.startPipeline()

    frame_buffer = device.getOutputQueue(name='custom', maxSize=4)

    while True:
        frame = frame_buffer.get()
        # Model output
        layer = frame.getFirstLayerFp16()
        # Reshape
        layer = np.array(layer, dtype=np.uint8)
        shape = (300, 300, 1)
        frame_data = layer.reshape(shape)
        cv2.imshow('Image', frame_data)
        if cv2.waitKey(1) == ord('q'):
            break
This produces something like:
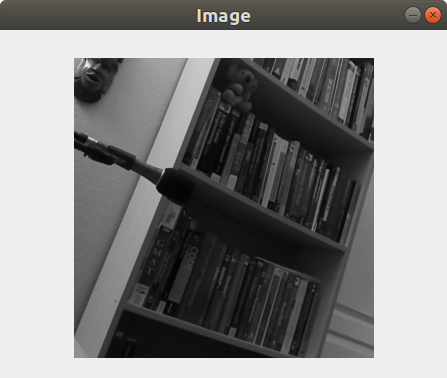
You are looking at a gray scaled version of my office. Even though this seems like a lot of work to get a gray scaled image, we can easily swap the model to something a lot more complicated, and still use rest of the pipeline.
Conclusion
We successfully ran vectorized math on the VPU by taking advantage of the existing ML pipeline. This means, that we don't have to write any OpenCL, and given the model is a traditional PyTorch model, we have access to a real debugger. This makes for a much more pleasant developer experience.
Epilogue
- I want to thank the folks at Luxnonis for answering all my questions patiently, as I was working on this approach.
- The source code is available here.
- I am using the Depth AI
gen2-pipeline. The documentation for their new pipeline API is here. - When Installing the OpenVINO SDK, do not use their official scripts. The scripts install python packages globally rather than defaulting to a
virtualenv. This makes things a lot more complicated. Intel, if you are listenting, please make your
scripts default to a virtual environment.