Apr 22 2020, Tue
Style Transfer from first principles
Preface
Ever since I started dabbling with Deep Learning, one of the papers I have wanted to implement from scratch is A Neural Algorithm for Artistic Style. This paper completely transformed my perception about Deep Learning. This is because, you could see the model do something very magical; taking an ordinary photograph and adding a masters' touch to it.
Introduction
For Style Transfer you need 2 images. The image you want to add some style to is called a content image. The style comes from a style image.
The idea behind Style Transfer is that you have models like VGG19 which have a higher level understanding of what the components of an image are. The deeper layers in these models understand things like texture in images.
So if we took the activations of these deep layers for both the content and style images, and transformed the activations of the content image such that it started to look more like the style image, while still maintaining resemblance to the original content image; we would successfully inject style into the content image.
Implementation
A Quick Note
I am going to use PyTorch to implement this paper. There is an excellent PyTorch tutorial on this topic as well which serves as an excellent reference.
I errored on the side of keeping the code snippets easy to read. If I were to implement this model for production, there would be a lot of refactoring.
The full source code in this article is here.
Layer Activations
To get started with Style Tranfer it is clear that we need the layer activations from the deeper layers in a model like VGG19. So lets write a class that can extract the layer activations for a given image. For this we can use the pretrainined models that PyTorch has.
First, let's get some imports & setup out of the way.
import matplotlib.pyplot as plt
from PIL import Image
import torch
import torch.optim as optim
import torch.nn as nn
import torch.nn.functional as F
import torchvision.models as models
import torchvision.transforms as transforms

# Makes the plots bigger
plt.rcParams["figure.figsize"]= (10,10)
PyTorch does not make intermediate layer activations available out of the box. So we will wrap the VGG19 with our own nn.Module and extract the activations we care about in the models' forward pass.
class Vgg19(nn.Module):
  def __init__(self, debug=False):
    super(Vgg19, self).__init__()
    self._vgg19 = models.vgg19(pretrained = True).cuda()
    self._vgg19.train(False)
    self.features = list(self._vgg19.features)

    if debug:
      for i, feature in enumerate(self.features):
        print(i, feature)

    for feature in self.features:
      # No gradient descent required for modules, we don't really want to train the model.
      feature.requries_grad=False
      # Registers a forward hook to intercept layer activations and store them.
      feature.register_forward_hook(self._hook)

      self.content_layer_outputs = []
      self.style_layer_outputs = []

      content_modules = [
        # block_4_conv_2
        self.features[21]
      ]

      self.content_modules = set(content_modules)

      style_modules = [
        # block_1_conv_1
        self.features[0],
        # block_2_conv_1
        self.features[5],
        # block_3_conv_1
        self.features[10],
        # block_4_conv_1
        self.features[19],
        # block_5_conv_1
        self.features[28]
      ]
      self.style_modules = set(style_modules)

  def _hook(self, module, input_, output_):
    if module in self.content_modules:
      self.content_layer_outputs.append(output_)
    elif module in self.style_modules:
      self.style_layer_outputs.append(output_)
    return None

  def clear(self):
    self.content_layer_outputs = []
    self.style_layer_outputs = []

  def forward(self, x):
    return self._vgg19(x)
Here we define a nn.Module whhere the forward pass delegates to the underlying VGG19 model. Let's look a few bits in the source code in more detail.
self._vgg19 = models.vgg19(pretrained = True).cuda()
self._vgg19.train(False)
In the above lines, we are creating an instance of the pretrained vgg19 model. We want to run the model on the GPU which is why we are calling .cuda() on the model. The other important bit here is that we are marking the model as not trainable. This is because we don't really want to train the model here. All we want are the layer activations.
The layers that we are interested in are defined in the sets content_modules and style_modules.
We attach a forward hook to every sub-module in the vgg19 model so we can intercept the forward passes and store the layer activations.
Loss Functions
We now have a way to extract the layer activations we care about from vgg19. We also define 2 sets of layers that we are interested in. content_layer_outputs are going to useful to ensure that the output image has resemblance to the original input image. style_layer_outputs will be useful to determine if the artistic styles of the output image match the style in the style image.
Let I be the original input image. S the style image. The nn.Module we defined can be used to extract content & style outputs respectively.
If we wrote some pseudo code on how to extract the layer activations we are interested in, that would look something like:
vgg19 = VGG19()
# Forward pass on the input content image
vgg(I)
content_layer_outputs = vgg['content_layer_outputs']

# Clear intermediate state
vgg19.clear()

# Forward pass on the input style image
vgg(S)
style_layer_outputs = vgg['style_layer_outputs']
The next step is to be able to define loss functions. We need to define multiple loss functions here. This is because we have multiple constraints.
- The
outputimage should still look like the original input image. (feature_loss) - The
outputimage should have the artistic style of thestyleimage. (style_loss)
For 1, we need to define a loss function called feature_loss which compares the mean squared error between the content_layer_outputs of the content image, and the content_layer_outputs of the output image.
def feature_loss(input_features, output_features):
  return F.mse_loss(input_features, output_features)
2 is a bit more complicated. To define style_loss, We have to compare style_layer_outputs of the style image with the style_layer_outputs of the output image.
style_layer_outputs in both cases are n-dimensional arrays of shape (B, C, H, W) where B is the batch_size, C are the number of channels (in our case filter outputs in layer activations), H is the height and W is the width of the layer activations.
def gram_matrix(tensor):
  a, b, c, d = tensor.size()
  # Create a 2D view of the tensor
  features = tensor.view(a * b, c * d)
  # Compute the gram matrix
  G = torch.mm(features, features.t())
  # Normalize it by the number of features
  return G.div(a * b * c * d)

def style_loss(style_features, output_features):
  b, c, h, w = output_features.shape
  A = gram_matrix(style_features)
  G = gram_matrix(output_features)
  return F.mse_loss(A, G)
To compute style_loss we need to understand something called a gram matrix.
For a matrix M with shape ( R, C) for rows & columns, the gram_matrix = M * M.t() where M.t() is the transpose of M.
The significance of the Gram Matrix is that it gives a set of linearly indipendent colums.
Once we have the gram_matrix defined, all we need to do is to compute the mean-squared-error loss between the ouputs of the gram_matricex of the style_layer_outputs of the style image with the style_layer_outputs of the output image.
Finally, we can now define the total_loss function which is just a weighted sum of the above 2 losses.
def loss_fn(b_content_features, s_style_features, input_tensor):
  '''
  b_content_features are the content_layer_outputs from the original image
  s_style_features are the style_layer_outputs from the style image
  input_tensor is the tensor we are interested in
  '''

  batch = input_tensor.unsqueeze(0)
  # Compute the content & style layer outputs for the `input_tensor`
  # vgg19 is an instance of the class we defined in the previous step
  vgg19(batch)
  c_features = vgg19.content_layer_outputs
  s_features = vgg19.style_layer_outputs

  # Compute feature losses
  c_loss = 0.
  for i in range(len(c_features)):
    c_loss += feature_loss(b_content_features[i], c_features[i])

  # Compute style losses
  s_loss = 0.
  for i in range(len(s_features)):
    s_loss += style_loss(s_style_features[i], s_features[i])

  # Weighted sum
  total_loss = c_loss + 100_00_00 * s_loss
  return total_loss
The Optimization Loop
Now that we have the loss functions, we just need to put everything together. Let's load the content image first.
base_image = Image.open('/gdrive/My Drive/colab/style_transfer/labrador.jpg')
plt.imshow(base_image)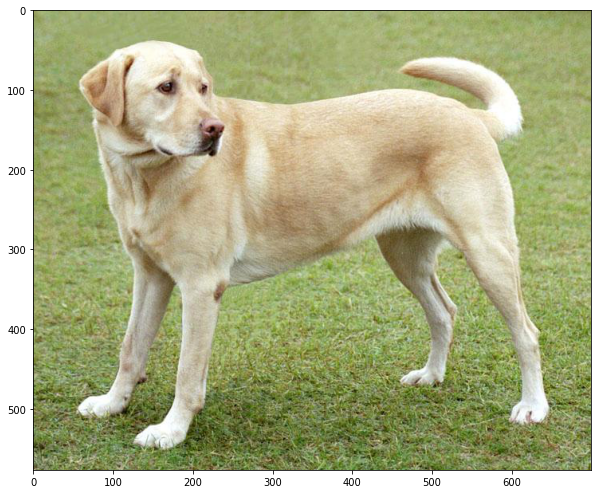
Now, lets load the style image. I am using Kandinsky's 7th composition for the style image.
style_image = Image.open('/gdrive/My Drive/colab/style_transfer/7th_composition.jpg')
plt.imshow(style_image)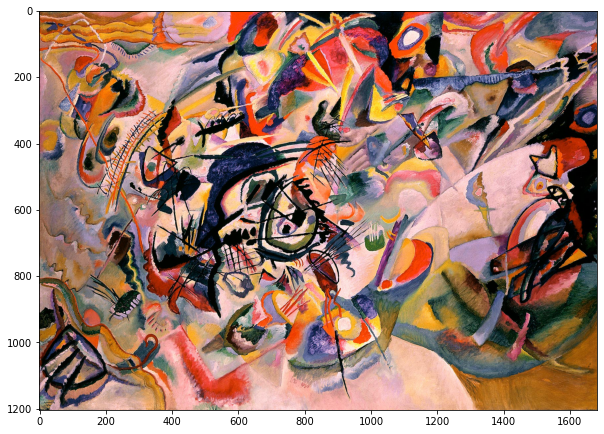
Let's resize both the images so they have the same shape.
style_image = style_image.resize((base_image.width, base_image.height))
plt.imshow(style_image)

to_tensor = transforms.ToTensor()
# Normalize the input image. For more information on this, please look at the linked Colab Notebook.
base_tensor = normalize(to_tensor(base_image).cuda())
print(base_tensor.shape)

style_tensor = normalize(to_tensor(style_image).cuda())
print(style_tensor.shape)
This gives us:
torch.Size([3, 577, 700])
torch.Size([3, 577, 700])
Let's do some setup for the optimization loop.
# Create a new instance of Vgg19
vgg19 = Vgg19()

# A helper to clone a list of tensors
def copy(t_list):
  return [t.detach() for t in t_list]

# Extract Content Features
vgg19(base_tensor.unsqueeze(0))
b_content_features = copy(vgg19.content_layer_outputs)

vgg19.clear()

# Extract Style Features
vgg19(style_tensor.unsqueeze(0))
s_style_features = copy(vgg19.style_layer_outputs)

vgg19.clear()
Let's create an output_tensor_ which is the same as the base_image ( content image) to start with.
Note that we are calling requires_grad_() on the output_tensor_ because we want PyTorch to keep track of the gradients (for gradient descent).
We the define a optimizer with a list of parameters that only includes the output_tensor_. This is the only parameter that it needs to optimize.
# Start with the input image
output_tensor_ = base_tensor.clone().detach()
# Add requires_grad because we want to compute the gradients
output_tensor_ = output_tensor_.requires_grad_()

# Define optimizer
optimizer = optim.LBFGS([output_tensor_])
We are now ready to define the optimization loop.
vgg19.clear()
run = [0]

def step_fn():
  # At every step clear the previous gradients
  optimizer.zero_grad()
  # Clamp the output tensor values between 0 - 1
  output_tensor_.data.clamp(0, 1)
  # Compute loss
  loss = loss_fn(b_content_features, s_style_features, output_tensor_)
  # Extract the loss value as a scalar`
  loss_value = loss.item()
  # Compute the gradients
  loss.backward()
  # Clear intermediate state of the nn.Module we defined
  vgg19.clear()

  if run[0] % 50 == 0:
    # Prints the loss every 50 iterations
    print(run[0], loss_value)

  run[0] += 1
  return loss_value

def optimization_loop():
  max_epochs = 350
  while run[0] < max_epochs:
    optimizer.step(step_fn)

  # Clamp the outputs between 0 - 1 for the last step
  output_tensor_.data.clamp(0, 1)
  print('Done')

optimization_loop()
The optimizer adjusts the output_tensor_ at every step to minimize the cumulative loss.
Results
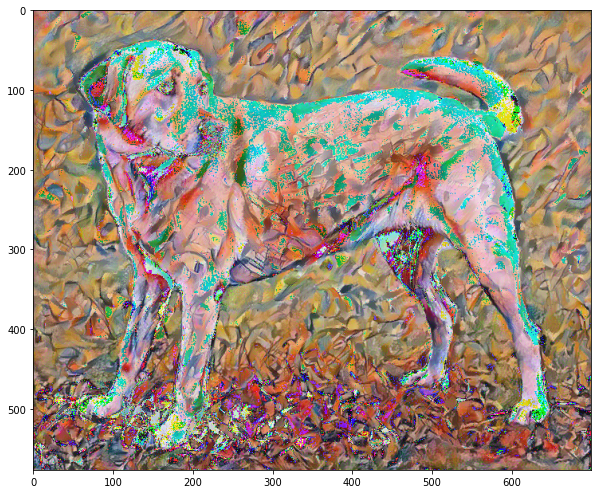
Finally, it's time to look at the results.
# We are using .data because we want the values of the output_tensor without affecting the gradients
results = output_tensor_.data

print(results.shape)
# Convert the output_tensor which was normalized back to an image
results = deprocess(results, [0.485, 0.456, 0.406], [0.229, 0.224, 0.225])
result_image = transforms.ToPILImage()(results)

# Show image
plt.imshow(result_image)